
Some things to know before you start
You need a space to squat with electricity, which is not affected by dust, sawdust, noise (cutting) and odors (resin).
You need to have plenty of free time and be patient. It's rare that everything goes perfectly the first time, not to mention that there's quite a bit of preparation involved.
You need to be at least somewhat organized and handy. Cutting tools require dexterity and precision. Don't hesitate to practice on scraps.
If you don't have all the tools, there is always a solution in your entourage: a loan from a neighbor / relative / friend, a low-cost rental in an association or a DIY store. The same goes for materials with recycling!!!
5 steps in 5 DAYS
DIY clone kits
A selection of quality materials, tested and approved, that fit together without any surprises.
A moderate price, no extras, all received in one go.
LIN SKI KIT
Flax fibers offer more flexibility and comfort than rigid and brittle glass fibers over time. To make your skis as light as possible while maintaining exceptional properties, we have selected BCOMP® cores (Swiss brand) in balsa linen, a sure value. The cherry wood fields guarantee good waterproofing by protecting the core while providing more responsiveness to the ski than ABS. The impregnation and assembly of the sandwich will be carried out with a bio-sourced resin efficient and easy to apply (we have been using them for over 10 years in all our production). Choose a top sheet IPS with a personalized UV printing decoration or a chestnut wood veneer laser engraved for unique, custom-made, high-end skis.

from 250€

Tools & Materials
- tools -
- a 5 m² room
- 1 or 2 stable worktops of 2 mx 80 cm
- 1 drill/screwdriver
- 1 jigsaw + wood and metal blades
- 1 router with a Ø17 cutter and Ø16 bearing
- 1 belt sander + sandpaper
- 1 manual or electric hacksaw
- 1 bender or small muscular arms
- 1 vice grip
- 1 multi-grip pliers
- 1 pair of cutting pliers
- 1 pair of scissors
- 1 cutter with good blades
- 1 bubble roller
- 1 wide flat brush
- 4 or 6 weights (doughnuts or rice jars or boxes (canned)
- 10 small plastic clips
- 4 or 6 medium clamps
- 2 pots to make the resin mixture (wide opening, or small basin)
- 1 kitchen scale (to accurately proportion the resin and its hardener)
- stick or spatula
- 1 vacuum cleaner to clean it!!
- 1 hair dryer
- a pair of soft gloves
- a pair of leather gloves
- safety glasses
- a mask with a particle filter
- noise-canceling headphones
- old clothes or the disposable white jumpsuit
- a tape measure or ruler
- small supplies -
- 30 wood screws, length 60 mm
- 2 tubes of cyanolite glue
- acetone
- rubbing alcohol
- 5 m of wide tape
- 10 m of double-sided tape
- 1 pencil, 1 marker
- rags
- raw material 3D machining table -
- 1 board of 2mx 0.5m wooden shelf type
- 2 galvanized steel corners 250cmx3.5cmx3.5cm
- 40 threaded rods of 10cm in 6mmØ + 170 nuts + washers
- A trolley for the router, to be assembled with the offcuts of angle iron and a few screws + nuts
- raw material for vacuum packaging -
- 2 m2 of PVC plastic tarpaulin (vacuum and clean)
- 6 m of sealing gasket
- 2m of 120 micron PE tube (vacuum connection)
- 1 valve to be welded onto the vacuum tank
First of all, we invite you to read this article about shapes To find the skis that best suit you. There are many other, more complete options; it's up to you to search now!
Then take inspiration from the sidecut of a brand-name ski that corresponds to a model you have already tested or a desired skiing style based on your weight and height.
You will soon be able to download complete profiles of different skis here. We are currently finalizing the document which will be available in December 2019 and which we will provide already printed in real size in our ski kits.
PLEASE DRAW ME A SHAPE...
There is a SnowCAD-X free open source software to design the shapes of your skis or snowboard. We highly recommend it; it has been used by the ski industry for a very long time. It is specialized, efficient, and easy to use for a beginner, even though it is entirely in English. Simply enter the sidecut dimensions in mm, export the DXF profiles, and... convert to PDF for free online on one of the following sites then print the templates at 1:1 scale on your home printer by assembling the A4 sheets using Acrobat Reader software (see Acrobat reader video tutorial here).
It works on all platforms Mac/PC/Linux and others… Just make sure you have Java installed. If not, get it from https://www.java.com/
Download the zip file by clicking here, unzip it and double-click on snoCAD-x.jar
The author of SnowCAD-X also offers MONKEYCAM, a free CAM software that covers the main features of SnowCAD-X but also allows you to directly machine your CNC machine using G-code. Find the software on the website. https://www.monkeycam.org/
WHAT IF I GO STRAIGHT TO STEP 3
If you wish to avoid 3D machining the cores below, due to complexity, lack of time, inclination, or motivation, you can search for a CNC machine near you on this site or a FabLab that will prepare the core for you. You will also soon be able to order it ready-made from our website.

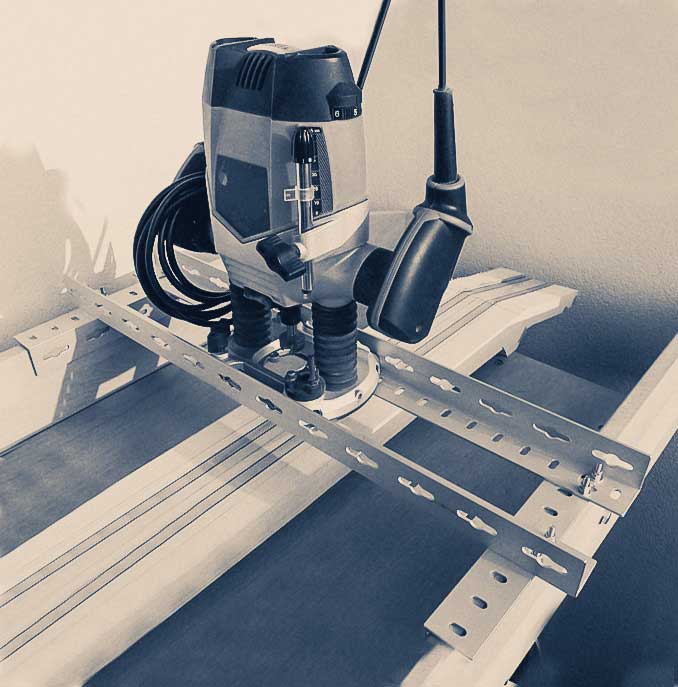
Fix a corner on each length of the board with the threaded rods, every 10cm. AWith this system the machining profile can be adjusted as desired.
Make a carriage for the router
with the corner pieces and the nuts
either the router is just placed on it and can move back and forth, or the router is fixed in its center so it is the whole carriage that moves back and forth
- Cut out the core profile (without the value of the fields) with the jigsaw
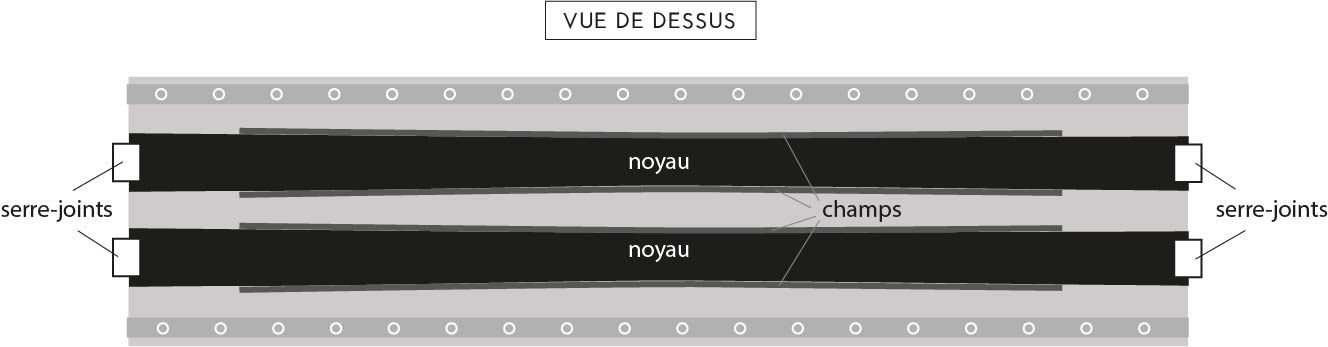
- Paste fields right and left on each core
- Fix the 2 cores on the table to be machined with the help of double-sided tape, then add 4 clamps to the ends
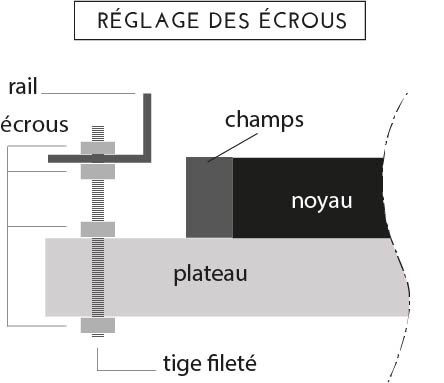
- Adjust the height of the rails of the machining table by adjusting the nuts located below the angle iron
- Machine by moving the router on all axes To gradually obtain the profile, make several passes. Don't go too fast; it's meticulous and time-consuming. Protect your ears and take breaks as well…
- Take out the machined cores, cut the spatulas and heels at the right length
- Sand the cores to remove any streaks of the router
- Cut out the core profile (without the value of the fields) with the jigsaw
- Paste fields right and left on each core
- Fix the 2 cores on the table to be machined with the help of double-sided tape, then add 4 clamps to the ends
- Adjust the height of the rails of the machining table by adjusting the nuts located below the angle iron
- Machine by moving the router on all axes To gradually obtain the profile, make several passes. Don't go too fast; it's meticulous and time-consuming. Protect your ears and take breaks as well…
- Take out the machined cores, cut the spatulas and heels at the right length
- Sand the cores to remove any streaks of the router